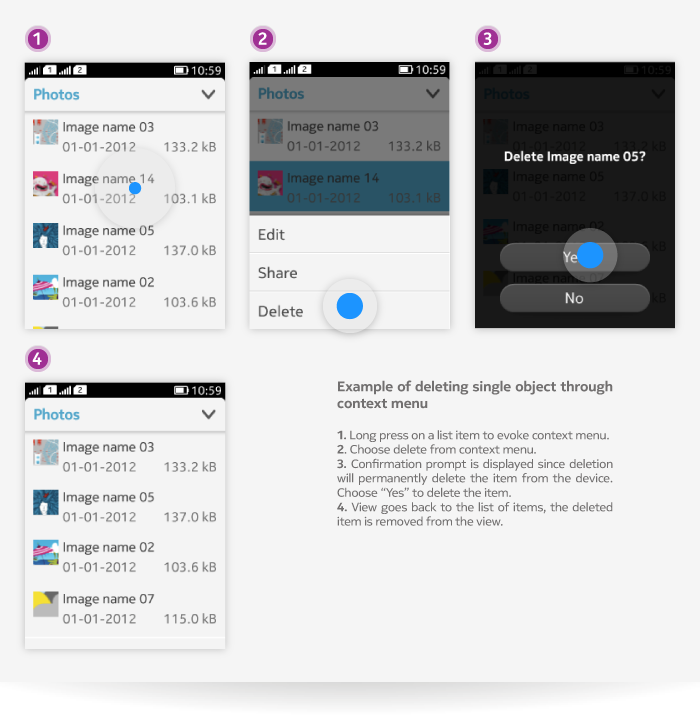
Deleting
- Deleting means taking items or content away permanently, and is typically done by:
- Using object related context menus, or
- Selecting command from the toolbar or option menu.
- Removing only takes away content from a certain location.
- Can be done by a long press which invokes arrange mode with a specific (x) button on items.
- Tapping on the (x) button removes the item.
- Exception: In Apps screen, pressing (x) button will uninstall application and delete related file(s) instead of just removing from the view.
Confirmation and feedback
- Do not use confirmation prompts if deletion does not cause major loss of data, or items can be easily recovered.
- For example, deleting a clock alarm is a simple action and also relatively harmless, therefore it does not require a prompt.
- Sets of settings or configurations do not require confirmation prompt.
- Permanently deleting important content, such as an image or contact card, should always present a confirmation prompt if no trash folder for deleted items is available.
- After deletion, the views that follow should make it clear to the user that the object has been deleted and provide visual feedback. Some examples of the feedback are:
- From a list or grid, the view should be updated so that the removed object is no longer visible.
- From single item view, user should be taken back to the previous content list which no longer features the removed object.
- From a photo gallery, the user should remain in the gallery but be presented the next picture.
- In some applications, like Mail, the trash folder can be used as an intermediate storage for deleted items.
- The user still has a chance to restore 'deleted items' from the trash folder, so confirmation prompt is not needed when item is moved to trash folder.
- While emptying the trash folder, a confirmation prompt about deleting should be provided.
- After deletion, the views that follow should make it clear to the user that the object has been deleted and provide visual feedback. Some examples of the feedback are:
Terminology
Do not use the term 'Delete' if the item or a link to it can be recovered. Use ‘Remove’, ‘Move to Trash’ or ‘Cut’ instead.
- ‘Remove’ typically clears an item from a collection or a shortcut from a view.
- For example, the user can remove a song from a playlist in the Music application. This will not remove the data file from the device.
- Deleting a song from the list of all songs eliminates it permanently.
- Use ‘Move to trash’ if the app has a ‘Trash can’ where the item can be recovered.
- ‘Clear’ means emptying a storage location.
- It is mostly used when clearing a whole list or a collection of its contents or an uncountable object, such as ‘memory’.
- Use ‘Clear’, for example, when emptying a log or a list of radio stations or browser history.
If there is ambiguity of what is being deleted, consider using ‘Delete [content]’, where [content] states the item type or item name.
Presenting the Delete command
- Always display the delete command to delete one item in the Options menu of single item view.
- If delete is a particularly important function to your application, designate an on-screen button for it in the toolbar area.
- Additionally, in views displaying multiple items, place the delete command in the context menu related to each item.
- Do not offer both ‘Delete’ and ‘Remove’ commands in the same context; see the terminology section above.
Deleting single objects with context menu
- Applications should provide the context menu for deleting individual items directly from list or grid.
- The long press context menu provides faster way of deleting single items than reaching the option from single item viewer.
- See LCDUI Menus (Options lists) and LWUIT Menus.

Deleting single item with CategoryBar action
- Do not locate the 'Delete' button in the application main view, always locate it in the item detail view.
- For example, gallery main view does not have delete button, the delete button is on the toolbar in single image preview view.
- Single item deletion does not typically require a feedback note to be shown.
- Visualise the item deletion in other means (See "confirmation and feedback" section above).
Deleting multiple objects at once
- Multiple items can be deleted at once by:
- Multi-selecting the deleted items (see Handling multiple items), or
- Selecting "Delete [all]" from Options menu.
- The "Delete [all]" option can be placed either in Options menu of the item or in multiselection mode.
- The "[all]" text can be replaced by content that will be deleted if there is more descriptive word for it.
- For example, message conversation view can provide "Delete conversation" command in options to empty the whole conversation with one command.
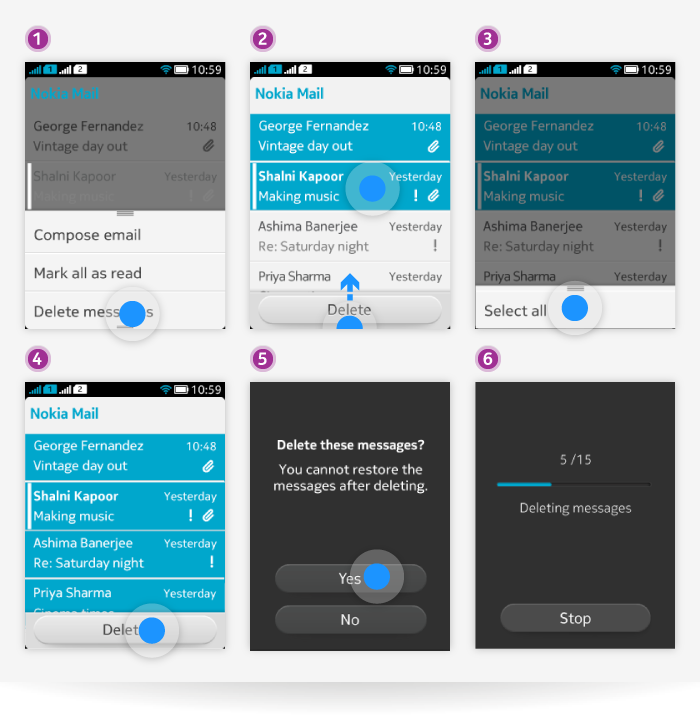
- The confirmation prompt for multiple items should include the number of items that will be deleted.
- When deletion of multiple items takes up more than 1,5 seconds time and user is not able to use the application before deletion has been successfully carried through, a progress dialog is displayed to inform the user about progress of the deletion progress.
- Showing progress dialog prevents user to use the application while deleting is in progress.
- Can include "Cancel" button if the deletion can be cancelled.
- NOTE: The intention of the timeouts is to avoid flashing screen by showing progress dialog for too short time.
- See also LCDUI Multiple selection and LWUIT Pickers.

Above is an example of deleting multiple items through Option menu. First the user enters multiselection mode by selecting "Delete messages" from the Options menu (1). From the multiselection mode, the user can tap on multiple items to select them and she can swipe up to reveal the Options menu, which contains "Select all" option (2). Tapping on "Select all" selects all items for deletion (3). Once all items are selected, she can then tap on "Delete" to delete all messages (4). A confirmation dialog is then shown (5) and, after the user taps on "Yes", a progress dialog is displayed (6).